Overview
This introductory document is intended to illustrate how to
perform basic tests on hard drives, SSDs, and systems using both
Scannerz and Scannerz Lite. FSE and FSE-Lite,
Phoenix, and Perfomance Probe 2, which are
included in the Scannerz package will not be addressed.
This page covers only the basics of using Scannerz and Scannerz
Lite. The user manuals provided with both products
contain many more details.
What are Scannerz and Scannerz Lite?
Scannerz and Scannerz Lite are both hard drive,
SSD, and system test tools developed for Macs using Mac OS X
versions 10.5 (Leopard) through 10.11 (El Capitan) with Intel or
PowerPC processors. We provide updates for new OS versions
usually within a week or two after the release of any new
operating systems free of charge.
Scannerz is the fully featured version of the product and
is intended to be used to by people that not only want to test
their systems, but if problems are encountered, be able to
determine the causes and possibly repair or remedy the problems
themselves. Scannerz Lite is intended to be used
by people that want to identify if their systems have problems,
and if present, take it into a qualified repair center for
further evaluation.
Scannerz has three test modes known as Normal Mode,
Diagnostics Mode, and Cursory Mode, whereas Scannerz
Lite has only one mode which is essentially the equivalent
of Scannerz' Normal Mode.
Scannerz can be used in a Normal Mode test for
evaluating drives and systems to ensure that they're working
properly. If problems are encountered, troubleshooting may be
performed by using Scannerz in its Diagnostics Mode.
Diagnostics Mode tests are, for the most part, automatic.
Additionally, a user can configure custom tests using Scannerz
Cursory Mode. With Scannerz the user will be able
to do the following:
- Perform standard surface scan tests on a hard drive or SSD to detect bad and weak sectors or blocks
- Perform seek scan tests on a drive
- Detect data corruption occurring between the drive and the system
- Detect memory problems.
- Detect logic board problems or other problems that yield
intermittent or heat related malfunctions or delays.
- Detect and identify abnormally long operations such as head parking events and system or drive timeouts
- Help isolate possible cable and connector problems
- Analyze the historical performance of a drive over time
- Use Cursory Mode to analyze problems in more detail and isolate the source of problems
- Monitor the drive for S.M.A.R.T. failures during surface scan tests
- Perform drive probing on a drive with confirmed bad sectors to evaluate how extensive the damage is
- Using FSE or FSE-Lite, identify applications generating excessive drive activity
- Using Phoenix, create an emergency boot volume and perform basic volume cloning
- Help isolate other performance problems with Performance Probe 2
Scannerz Lite is intended to be used by people that
aren't interested in evaluating problems, but rather want a low
cost way to perform a test and if there are problems, take it in
for servicing without pursuing the issue any further. With Scannerz
Lite, the user will be able to do the following:
- Perform standard surface scan tests on a hard drive or SSD
- Perform seek scan tests on a drive
- Monitor the drive for S.M.A.R.T. failures during surface scan tests on internal drives
- Perform drive probing on a drive with confirmed bad sectors to evaluate how extensive the damage is
- Detect the presence of abnormal system problems.
Both Scannerz and Scannerz Lite are based on a
technology known as fault detection. Many logic board or even
software related problems may exhibit the same symptoms to an
end user as those typically associated with problematic hard
drives or SSDs. When Scannerz or Scannerz Lite are
performing a Normal Mode test (the only mode available
for Scannerz Lite) they are not only looking for media
problems (problems with sectors on a hard drive or memory blocks
on an SSD), they are also monitoring the system looking for
abnormal timing deviations. Such deviations, which we call timing
irregularities, or irregularities for short,
can often be sourced to another problem, such as a faulty cable
connected to the drive or even a logic board problem.
Most other test tools available for Macs will perform a test on
a drive and look only for I/O errors, but both Scannerz
and Scannerz Lite will be able to detect not only I/O
errors often associated with a bad sector on a hard drive or
SSD, but also some of the timing problems described above. If
Scannerz finds significant I/O errors and/or timing
irregularities during a test, the user may put Scannerz
into Diagnostics Mode to evaluate the problem and help
isolate it. If Scannerz Lite detects such problems, the
user should consider the unit being tested as having problems
and take the unit in for servicing (once again, Scannerz
Lite is designed to simply tell a user if they have
problems, whereas Scannerz can help the user find the
source of the problems).
The Basic User Interfaces for Scannerz and Scannerz
Lite
The basic user interface for Scannerz and Scannerz
Lite are as follows, however there is no tabbed selector
in Scannerz Lite allowing the other test modes:

When Scannerz or Scannerz Lite first start up
the window will appear similar to that shown above. The elements
of the basic user interface are as follows:
Drive/Volume Selection: Primary drives and
their volumes are shown in this section. The drive/volume
listing is scrollable and the user scrolls the window (if
needed) to find the desired unit to test and simply clicks on it
to select it.
Selected Drive/Volume Info: After a unit is
selected as described above, this section fills out with
information about the selected drive or volume. This will also
report on the S.M.A.R.T. status of the drive. During all media
scan tests, S.M.A.R.T. status is periodically checked in case a
drive is failing.
Drive Display Mode: This allows the drives and
volumes to be organized in different ways to make it easier to
identify the drive configurations, particularly those associated
with more complicated configurations such as Core Storage and
RAID components.
Test Mode Selection: This is not present on
Scannerz Lite, only Scannerz. By clicking on
one of the tabs using Scannerz, you can easily switch
between its three modes of operation: Normal Mode,
Diagnostics Mode, or Cursory Mode. Scannerz
Lite essentially functions in the equivalent of Normal
Mode for Scannerz.
Test Progress and Results: This area identifies
the overall progress of the tests and identifies any problems
detected. In the test data shown above no errors or
irregularities have been detected during either the media
(surface) scan or the seek scan.
Testing Controls: Tests may be controlled using
the buttons identified above. Unlike other testing tools, with
Scannerz and Scannerz Lite you may stop a test,
save the data, and resume the test at a later time or even day.
This is particularly useful for very large drives or to stop a
test and examine any detected problems using Diagnostics
Mode (not available on Scannerz Lite).
What Are the Signs of a Drive or System Problem?
The typical signs of drive or system related problems are
characterized by some the following:
- Unexplained lock ups or delays, often accompanied by "spinning beach balls" when using the system
- Copies stop midstream for no apparent reason
- Dialogs appear indicating the operation couldn't be completed which may be accompanied by an I/O error warning
- Problems booting the system
- Certain applications become dysfunctional when specific tasks are started
- A question mark appears when turning the system on and system fails to boot.
- A prohibited sign appears when turning the system on.
- Repetitive noises come from the drive when attempting to access certain files.
- Abnormally loud drive noises, such as clicking, grinding, or squealing noises.
This list is not complete, it's simply a list of the most likely
problems that can be related to a drive or system. More
information on hard drive problems may be obtained by visiting
our How-to section of this web site and review the section on
problems with hard drives and SSDs.
In the following two sections we'll describe how to perform
basic tests using Scannerz, followed by Scannerz
Lite. Keep in mind this is an introductory document and details
about Scannerz Diagnostics Mode will only be covered
briefly.
Performing a Basic Drive Test Using Scannerz
When using Scannerz, typically you run a full test on a
volume or drive in Normal Mode, and if needed, run a Diagnostics
Mode test. If Scannerz detects problems the user
may stop the Normal Mode test and go right into Diagnostics
Mode if they like. Cursory Mode is primarily used
for individuals that wish to design and perform custom tests on
a device.
A Normal Mode test can be started, paused, stopped, and
resumed. For example, if you have a large drive (such as a 2TB
backup drive) that you want to test, running a test non-stop may
take a very long time. With Scannerz, you can stop a Normal
Mode test, exit the application, and then resume the scan
where it left off at a later time.
A Normal Mode test is complete when the entire media has
been subjected to both a surface and seek scan. The time
it takes a Normal Mode surface scan to complete
is dependent on the size of the volume or drive, the data
transfer speeds from the media and it's controller, and
finally the speed of the interface itself. The larger the size
of the drive or volume, the longer a Normal Mode surface
scan will take to complete. A seek scan test on an
electromechanical drive will test it for possible malfunctions
or deterioration of the positioning mechanisms in the drive,
whereas on an SSD it will be monitoring how evenly block access
is distributed across the drive. During all Normal Mode
tests Scannerz will also be monitoring the system to see
if any timing deviations are being detected.
Step by step instructions for performing a Normal Mode test
are as follows:
- Stop all other applications running on the system. This is
more or less required on older, single core systems, but is
recommended for all systems.
- Navigate to the Applications → SCSC folder
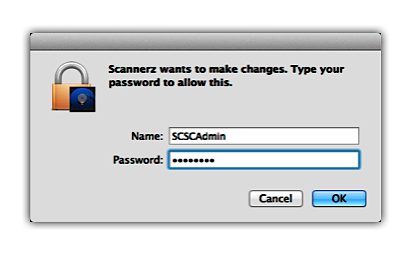
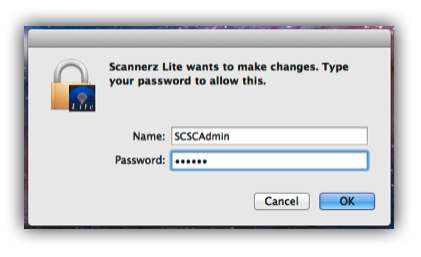
- Double click on the Scannerz application icon. You will need to enter an administrative user ID and password before Scannerz will start to launch as shown in the screenshot below.
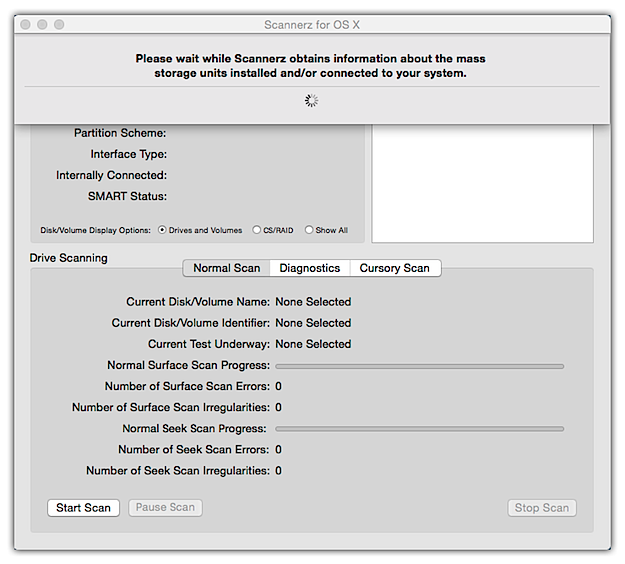
4. Wait for Scannerz to load all the system and drive
information. If some drives are asleep it may take a bit longer
for Scannerz to start because it won't register the
drives until they wake up. As the system and drive information
is loaded, drop down windows will indicate whats going on and
when complete, close. This is illustrated in the screenshot
below.
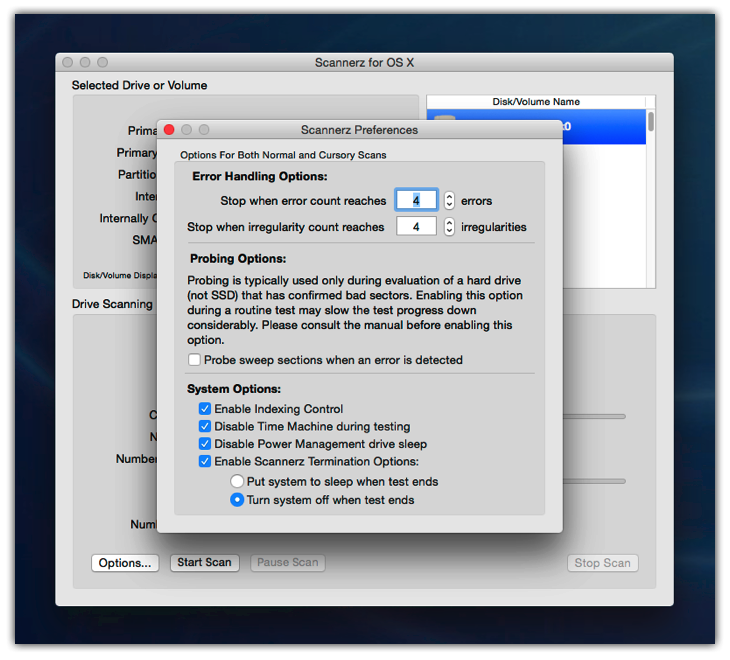
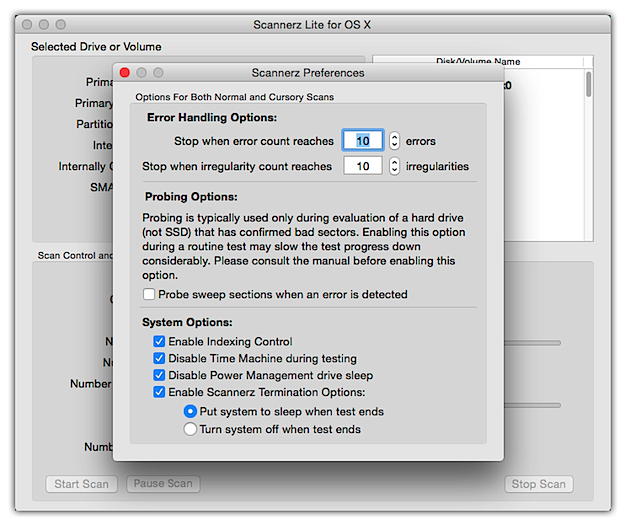
5. After system and drive information is loaded, click on the “Scannerz”
menu item, and then select “Preferences” from the pull
down and verify that the preferences are set properly
(preferences are described in the users manual.) This is
illustrated in the screenshot below. Once you're familiar with
Scannerz, you probably won't need to do this often, but it
can't hurt to check!
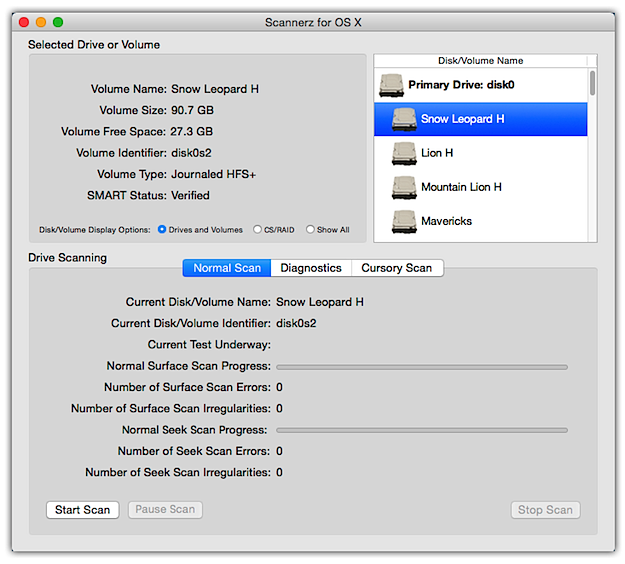
6. Along the top tabbed panel of the bottom half of the user
interface, click on the “Normal Scan” tab to put the application
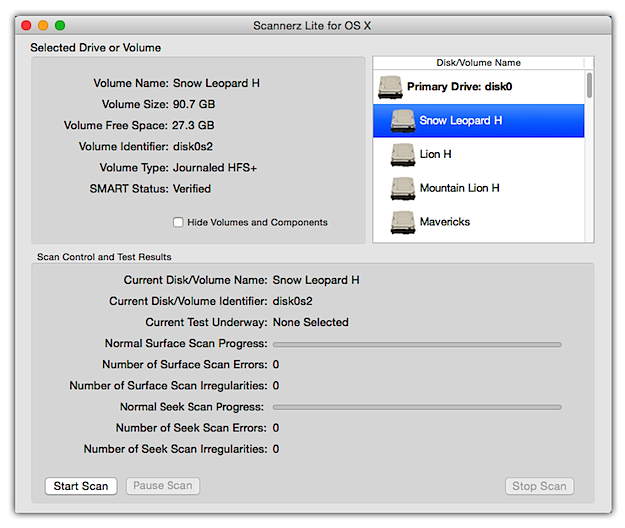
into Normal Mode. The screenshot below illustrates an
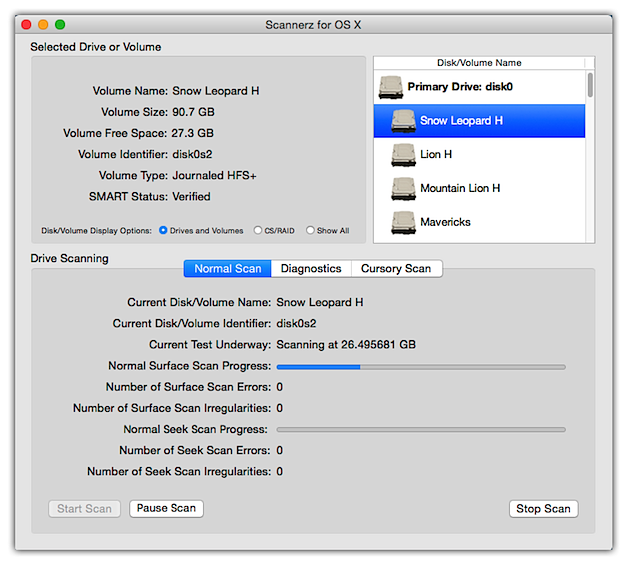
internal drive named "Snow Leopard H" selected for
testing. "Snow Leopard H" is indented with respect to it's
primary drive, labeled "Primary Drive: disk0." Scannerz
uses different icons to represent the type of interfaces which
are described in the manual. Other volumes showing on this drive
are "Lion H," "Mountain Lion H," and "Mavericks." If the
user scrolled a little further down the recovery partition would
be displayed as well.
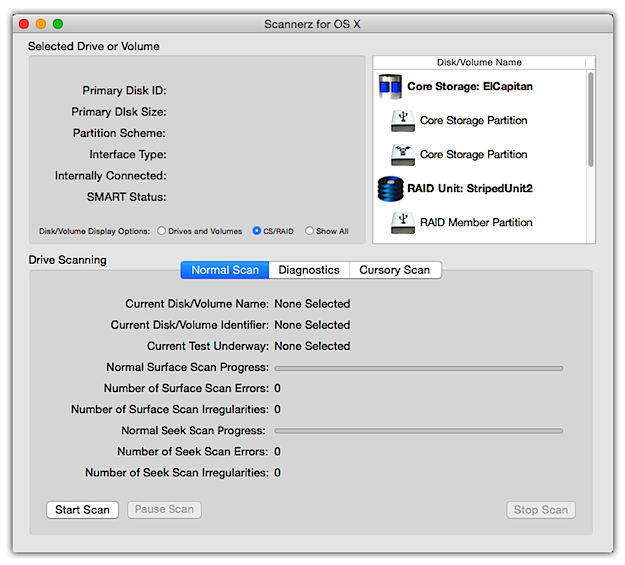
7. If you're using a more complex drive configuration such as
Core Storage or exposeable RAID, you may wish to select the
CS/RAID button in the "Selected Drive or Volume" section to make
it easier to identify the components. In the image below, the
"CS/RAID" option has been selected, which will filter out and
show only the visible components that use Core Storage, RAID, or
both. In the screen shot below there is a Fusion drive comprised
of a USB and Firewire drive making up the logical volume named
"ElCapitan" and a RAID volume named "StripedUnit2" is showing
it's first member. If the window in the drive list was scrolled
it would expose all the RAID members.
8. If you wish to monitor the logging activity with the logging
window, from the Scannerz menu bar, select “Window” and
then when the pull down menu comes down, click on “Logger
Display”. This step is optional and the logging window may be
opened and closed any time during a test. Logging information
for a surface scan is updated at roughly 1GB intervals and is
fairly slow, and seek scan information is updated at the end of
each seek scan increment which happens quickly. The logging
window is most useful in Diagnostics Mode.
9. Click on the “Start Scan” button. A series of dialogs will
appear in sequence that will allow you to configure the name of
the log file and its location if you wish to change the
name/location, and if the test is one that's being resumed one
will appear allowing you to resume the test. Dialogs of this
nature are self explanatory and described in detail in the
user's manual.
10. After responding to the dialogs, the tests will begin or
resume, depending on whether or not this is a new test or one
that's being continued from a previous session. The following
screenshot shows Scannerz performing a surface scan on
volume named "Snow Leopard H" The blocks (SSDs) or sectors (hard
drives) being scanned are described in the text to the right of
the field labeled "Current Test Underway," and the progress bar
changes as the scan progress advances.
When a hard drive, SSD, or system is working properly (unless
it's a very slow hard drive) the text field associated with the
test underway will likely change so rapidly the user won't be
able to read it. However, when Scannerz hits a bad or
weak region, or it encounters some type of problem, it will
almost come to a stop, perform a cursory analysis on the region,
and then flag it for evaluation for Diagnostics Mode. It
will also increment the counts associated with a surface scan
error or irregularity, as described in the manual. Re-evaluating
such problems in Diagnostics Mode is more or less
critical in such cases because a system can generate I/O errors
that may be caused by another system problem, rather than the
hard drive or SSD itself. The purpose of Scannerz is to
help you properly get to real the root of the problem!
11. During testing, a user may pause a scan by selecting the
“Pause Scan” button and resume it by clicking on the “Start
Scan” button, or terminate it using the “Stop Scan” button. A Scannerz
Normal Mode test may be stopped completely, allowing the
user to terminate the test (and Scannerz if desired)
and then resume the test at a later time or day. This is
convenient if the drive is large and the test will take a long
time to complete.
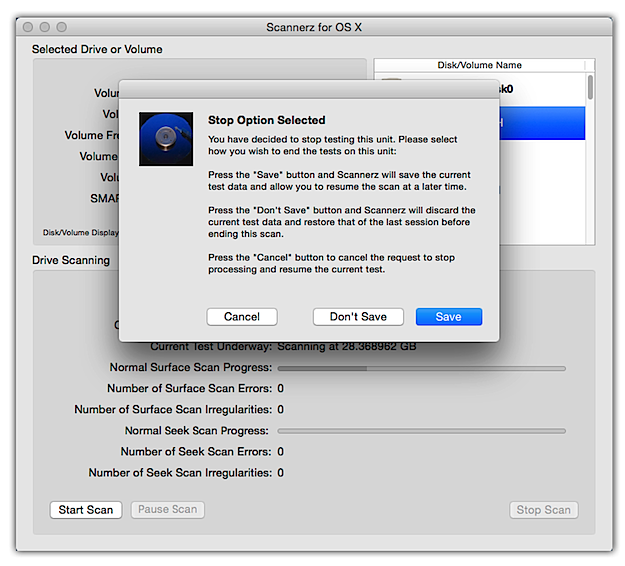
Important note: If Scannerz detects errors
or irregularities before a Normal Mode scan completes,
it is not necessary to scan the entire drive or system. This is
already indicating the presence of problems, and you may wish to
stop the test immediately, save the test results, and go right
into Diagnostics Mode for evaluation.
The two screenshots below show the dialogs that Scannerz
will present to a user allowing them to stop a scan followed by
the option to resume a scan. The dialog associated with resuming
a scan will be presented to the user during the sequence that
begins after the "Start" button has been selected. Further
details are provided in the users manual.

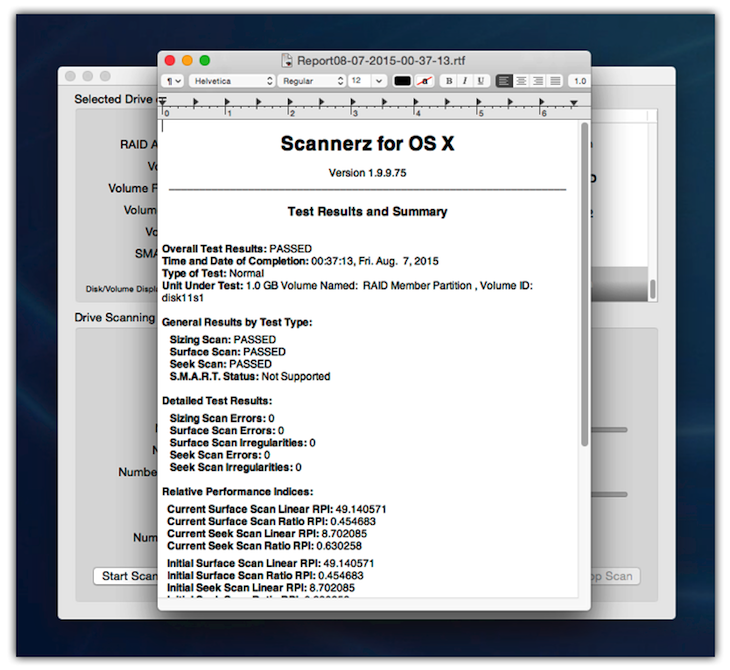
12. When a Normal Mode test completes successfully, a
dialog asking whether or not you wish to review the summary
report will appear. This report is in rich text (rtf) format and
will be opened in TextEdit.app if you wish to view it.
Selecting the option to review the file will allow you to save
the file under another name and folder if you wish to do so. A
screenshot of the summary report is shown below. If the report
isn't reviewed at test completion, it will be saved in the Documents
folder.
Pay attention to the relative performance indices (RPI values)
reported and analyzed by Scannerz. A significant change
in RPI values may indicate developing problems with the media
(both hard drives and SSDs). Changes in these values can
indicate a significant performance deviation and yet not be
reported by an S.M.A.R.T. analysis or be accompanied by errors
or irregularities. In a hard drive it typically indicates that
wear is beginning to take it's toll on the mechanical components
of a hard drive while it still manages to function, and on an
SSD it indicates that the memory cells are beginning to take
longer to access, which often indicates that either the
disk is excessively full or the over provisioned area of the SSD
is being depleted.
Basic Diagnostics Mode Testing Using Scannerz
Scannerz (not Scannerz Lite) comes with a feature
introduced in version 1.7 known as Diagnostics Mode. In
Diagnostics Mode, Scannerz will review the data
from a Normal Mode test, and if needed, perform a
battery of tests on not only the drive but the system to
determine the exact nature of any problems. If Scannerz
runs a test in Normal Mode and there are no errors or
irregularities detected and the system seems to be running fine,
Diagnostics Mode may not need to be used.
You will want to use Diagnostics Mode in any of the
following conditions:
- Irregularities or errors have been detected during a Normal Mode scan.
- There is excessive data corruption occurring.
- There are periodic system hangs or lock ups occurring, seemingly without warning.
An irregularity is an event that occurred during a test that Scannerz
has flagged as taking an abnormally long amount of time to
complete. Events that take too long are often indicators of
existing or developing problems. Excessive data corruption may
be occurring if the user frequently needs to use Disk
Utility to perform repair operations on the drive.
Periodic system hangs or delays may be caused by software
problems, system faults, or drive/system timeouts. Going into
details about these problems is beyond the scope of this
document, however those interested in investigating them further
may visit our page on advanced troubleshooting with Scannerz.
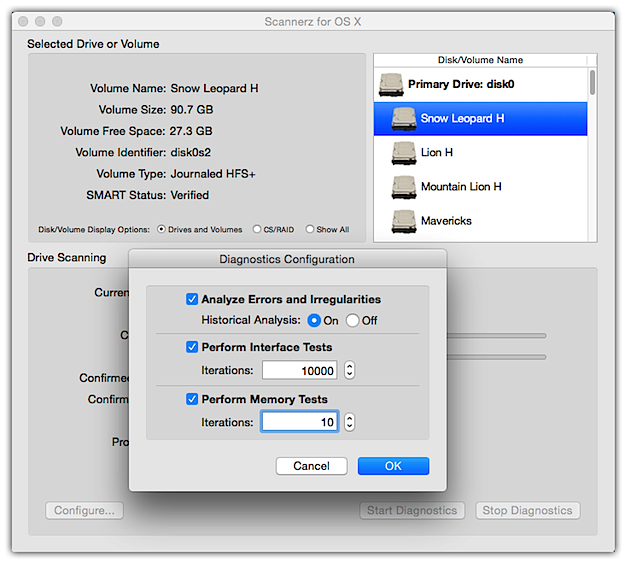
Diagnostics Mode allows essentially three options for
testing:
Analyze Errors and Irregularities. This option is
selected when you want to reevaluate any results from a Normal
Mode scan.
Perform Interface Tests. If excessive data corruption is
suspected of occurring this option allows the user to monitor
data transfers occurring between the system and the selected
volume. This test must be performed on a mounted volume
that is capable of read and write operations. This test may also
be used to help evaluate intermittent connections in bad
connectors or cables or even logic board traces, observe system
timeouts, and excessively long head parking events (mechanical
hard drives only)
Perform Memory Tests. If there are periodic system hangs
or lock ups occurring, seemingly without warning that can't be
correlated to any drives connected to your system, this may be
able to expose them. Calling this test a memory test is
something of an understatement because it can also expose logic
board faults as well.
To perform a Diagnostics Mode test, you select the media
from the list of available drives, click on the tabbed item
labeled "Diagnostics" and then click on the "Configure..."
button. This will bring up the Diagnostics Mode test
configuration dialog and is illustrated below.
After the tests are selected, you click on the "OK" button and
can optionally open the logging window. Testing begins once the
"Start Diagnostics" button is selected. The user may also stop
diagnostics mode testing by clicking on the "Stop Diagnostics"
button, which will terminate testing completely (it can't be
re-started where it left off since most tests in this mode are
quite specific.) A Diagnostics Mode session with the
logging window up may appear similar to the following:
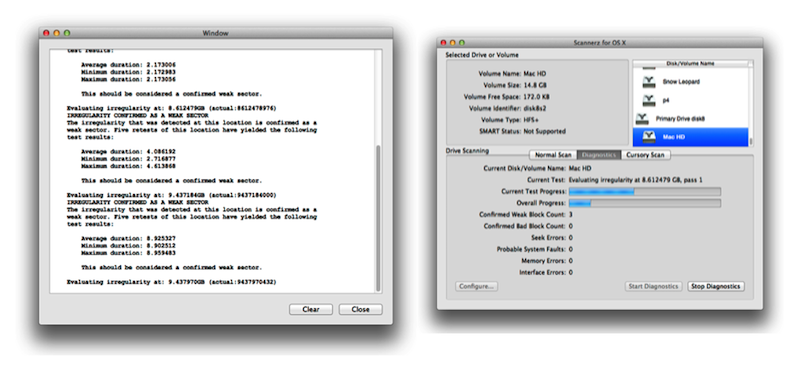
The Diagnostics Mode user interface has two progress
bars as indicated above. The top bar indicates the overall
progress of the current mode under test, and the bottom bar
indicates the progress of all tests selected. The entries
underneath the progress bars are as follows:
1. Confirmed Weak Block Counts. This indicates the media
being scanned has confirmed weak blocks. These typically occur
only on hard drives, but may occur on SSDs if the read time for
a specific block is excessively slow. Confirmations here
indicate that the problem is with the media (the hard drive or
SSD).
2. Confirmed Bad Block Count. Confirmed bad blocks will
be unreadable blocks or sectors on a hard drive or SSD. Once
again, these will indicate that the problems are with the media,
but in this case data will not be able to be recovered from the
block or sector at all.
3. Seek Errors. These will most likely only during
tests of mechanical hard drives. If they occur on an SSD it
usually indicates a faulty cable or connection or that the SSD
is failing to evenly distribute memory blocks for usage, which
can be a sign the drive is beginning to fail or has a firmware
error. In Diagnostics Mode, Scannerz always
checks seek values. A legitimate seek failure on a mechanical
hard drive is a serious fault, and typically indicates a drive
is failing.
4. Probable System Faults. These will occur during
interface tests and memory tests and are generated by
unrepeatable inconsistent irregularities or errors, indicating a
likely intermittent connection or erratic system failure of some
sort. Faults of this nature are usually related to the logic
board, but they can also be induced by supply problems and in
some cases, poorly seated and/or intermittent connections to the
logic board.
5. Memory Errors. This will increment if bytes written
and read to various location in memory are corrupt. This is a
critical error and indicates memory is corrupt or dysfunctional,
or the logic board is failing.
6. Interface Errors. This will increment if the data
between the system and the targeted volume is corrupt. This is a
critical error because it indicates data written to media and
read back is corrupt. In most cases either the I/O cable
connected to the drive is bad, or logic board components in the
path between the logic board's I/O controller and the cable
connector are intermittent.
Diagnostics Mode results can be viewed as Scannerz
completes them in the log viewer and will also be contained in
the associated log file. More details about Diagnostics Mode
may be obtained by visiting our page on advanced troubleshooting
with Scannerz.
Performing a Basic Drive Test Using Scannerz Lite
Scannerz Lite differs from Scannerz in the
following ways:
- There are no Diagnostics Mode or Cursory Mode options.
- There is no report generation at the end of a test.
- Scannerz Lite simply reports a pass/fail status at the end of a test
Scannerz Lite is intended to be used by someone that
simply wants to verify that their drive and system are
functioning properly, and if they aren't, take the system in to
a qualified professional for evaluation. It is not suited for
distinguishing between a system problem and a drive problem, it
cannot detect system timeouts or excessively long head parking
events, and it can't evaluate potential interface, system bus,
or memory problems. It can detect all these problems, but you
won't be able to use the product to isolate them.
Functionally, Scannerz Lite operation is very similar to
running a Normal Mode test in Scannerz, however
instead of having a "Normal Scan" tab, the user interface has a
single view on the lower section named "Scan Control and Test
Results." Scannerz Lite does not have a logging window.
Most SCSC products are now placed in a folder named SCSC under
the applications folder. Scannerz Lite is the only
product that doesn't conform to this and is placed in a folder
named "Scannerz Lite" under the applications folder.
Step by step instructions for performing a Scannerz Lite test
are as follows:
1. Stop all other applications running on the system. This is
required for older single core systems, but is highly
recommended for all systems.
2. Navigate to the Applications → Scannerz Lite folder
3. Double click on the Scannerz Lite application icon.
You will need to enter an administrative user ID and password
before Scannerz Lite will start to launch as shown in
the screenshot below.
4. Wait for Scannerz Lite to load all the system and
drive information. If some drives are asleep it may take a bit
longer for Scannerz Lite to start because it won't
register the drives until they wake up. As the system and drive
information is loaded, drop down windows will indicate whats
going on and when complete, close.
5. After system and drive information is loaded, click on the
“Scannerz Lite” menu item, and then select “Preferences” from
the pull down and verify that the preferences are set properly
(preferences are described in the users manual.) This is
illustrated in the screenshot below. Once you're familiar with Scannerz
Lite, you probably won't need to do this often, but it
can't hurt to check! The preferences in Scannerz Lite
are identical to those in Scannerz.
6. In the upper right hand corner of the Scannerz Lite
user interface, select the drive or volume that you wish to
test. Click on it and the information about the drive or volume
will fill out in the upper left section of the user interface.
7. Click on the “Start Scan” button. A dialog will appear
allowing you to rename and relocate the log file to a more
convenient location with a more user friendly name. If this is
not modified, Scannerz Lite will place it in the users
"Documents" directory with the default name that Scannerz Lite
created.
8. Once done a dialog will appear informing you to terminate all
other applications. This will also be the last dialog that will
allow you to back out of a test if you've made a mistake, such
as selecting the wrong drive or volume. If “Cancel” is selected,
you will return to the user interface, if you select “OK” the
process will proceed.
9. If this is a continuation of a test from a previous session,
then another dialog will appear giving you the option to
continue where the last test left off or start all over again.
The latter option will allow you to back out of a test that may
have been initiated incorrectly.
10. After making the selection in item 9 above, testing will
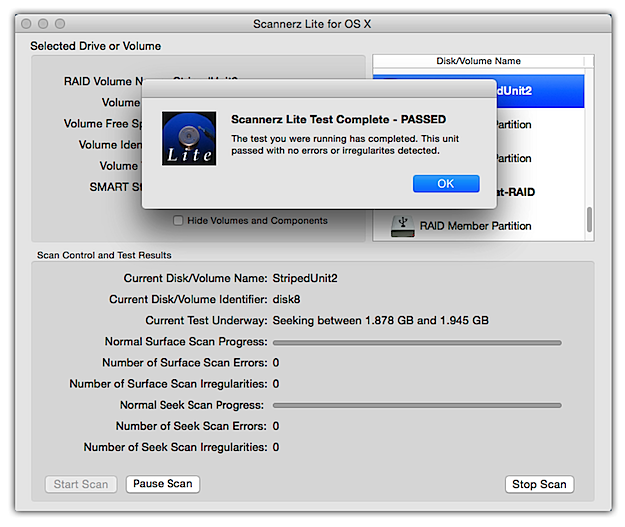
either begin or resume. The screenshot below illustrates Scannerz
Lite performing a seek scan on a RAID volume named
"StripedUnit2."
When a hard drive or SSD is working properly (unless it's a very
slow hard drive) the text field associated with the current test
underway will likely change so rapidly the user won't be able to
read it. When Scannerz Lite hits a bad or weak region,
it will increment the error or irregularity counts as
appropriate. If an error is detected, the unit needs
servicing. More details are provided in the Scannerz
Lite manual. As stated previously, Scannerz Lite
is not intended as a diagnostic tool, but as a verification
tool.

At the completion of a test, Scannerz Lite simply
produces a dialog indicating whether or not the unit passed or
failed, as illustrated in the following screen shot:
Scannerz Lite is intended to be essentially a pass/fail
tool. Log files and probing can allow you to evaluate a problem
in more detail, but it's intended primarily for people that
intend to let other people deal with any hardware problems they
may be having.
System Requirements  Scannerz
and Scannerz-Lite can be run on normally configured
systems using Mac OS X versions 10.5 (Leopard), 10.6 (Snow
Leopard), 10.7 (Lion), 10.8 (Mountain Lion), 10.9 (Mavericks),
10.10 (Yosemite), and 10.11 (El Capitan) using supported Intel or PowerPC
processors using drives with SATA, IDE, FireWire, most
Thunderbolt, and USB 2.0 (or greater) drive interfaces.
Both Scannerz and Scannerz-Lite are fully
capable of handling Core Storage components, including
full volume encryption using File Vault 2 under Lion, Mountain
Lion, and Mavericks, Yosemite, and El Capitan, multi-drive/volume virtual
volumes using Core Storage, support for Apple RAID, support
for most implementations of hardware RAID, and limited support
for third party software RAID implementations.
Scannerz
and Scannerz-Lite can be run on normally configured
systems using Mac OS X versions 10.5 (Leopard), 10.6 (Snow
Leopard), 10.7 (Lion), 10.8 (Mountain Lion), 10.9 (Mavericks),
10.10 (Yosemite), and 10.11 (El Capitan) using supported Intel or PowerPC
processors using drives with SATA, IDE, FireWire, most
Thunderbolt, and USB 2.0 (or greater) drive interfaces.
Both Scannerz and Scannerz-Lite are fully
capable of handling Core Storage components, including
full volume encryption using File Vault 2 under Lion, Mountain
Lion, and Mavericks, Yosemite, and El Capitan, multi-drive/volume virtual
volumes using Core Storage, support for Apple RAID, support
for most implementations of hardware RAID, and limited support
for third party software RAID implementations.
Scannerz and Scannerz-Lite will not support any
of the following types of devices:
- USB 1.0 or 1.1 devices, because the devices are so slow.
- Network drives, because they're too susceptible to network and connection problems
- Drives connected via Xsan or SAN, because so few of them are in use on normal systems.
- Optical drives of any type, because optical media itself tends to be the problem, not the drive.
- Very old hard drives using MFM and many SCSI interfaces, because they're rarely used anymore.
None of these devices should stop Scannerz or Scannerz
Lite from operating properly, we've simply decided not
to support them.
Purchasing Scannerz
To purchase one of the Scannerz packages, click on
the Buy Scannerz Now button below.
Prices:
$21.95 For Scannerz Lite
$39.95 For Scannerz with FSE-Lite,
Performance Probe, and Phoenix
$49.95 For a Scannerz with FSE,
Performance Probe, and Phoenix

Thanks for your interest.
Questions? Comments? Suggestions?
Thank you for your interest. If you have any questions or comments, please feel free to drop us an e-mail using any of the contact addresses found using the About section of our web site which can be found at the top of this page.
